Sample Collection Instructions
Instructions on how to collect your hair sample
For accurate Hair Tissue Mineral Analysis readings, the sampling process is very important. Be sure to read these instructions before beginning and follow them exactly. Feel free to reach out to me at info@HTMANURSE.com if you have any questions.
To help you understand why these instructions are so detailed, it will help to know the goals of the hair sample and testing process. The number of each goal relates to that step.
- Get an accurate reading of what’s happening in your body (not what’s on your hair).
- Test the most recent mineral and metal activity.
- Provide the lab with the necessary length and amount of hair, stored in a suitable way.
- Provide the lab with all the necessary components.
1. Prepare the hair for cutting
What to do:
- Wash the hair with a non-medicated shampoo.
- Dry the hair (either air dry or with hair dryer).
Things to consider:
- Avoid conditioner.
- Don’t use styling products between washing and taking the sample.
- If you wash your hair with baking soda, stop at least 1 week before taking the sample.
- If you take Epsom salt baths, stop at least 1 week before taking the sample.
- If you use Selsun Blue or Head & Shoulders shampoo, make a note of that on your New Client Questionnaire or Retest Questionnaire.
- If you only colour or bleach some areas of your hair, it’s fine to take the sample anytime from the non-treated areas.
- If you colour all your hair, take the sample before or wash the hair 4 times after.
- If you perm or bleach all your hair, take the sample before or wait at least 3 weeks after.
- If your home has a water softener, wash the hair 4 times with bottled water (can be bought from a grocery store) or unsoftened tap water before taking the sample.
- If you are exposed to external contaminants occupationally (e.g. welding, mining), plan to take your hair sample on a day when you don’t need to be at work.
- If your hair will be sampled by a hair stylist, print out these instructions and give to the stylist.
2. Cut the hair
What to do:
- Cut the hair between 4 and 24 hours after it’s dry.
- Use clean scissors.
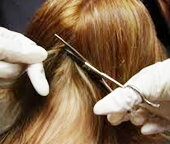
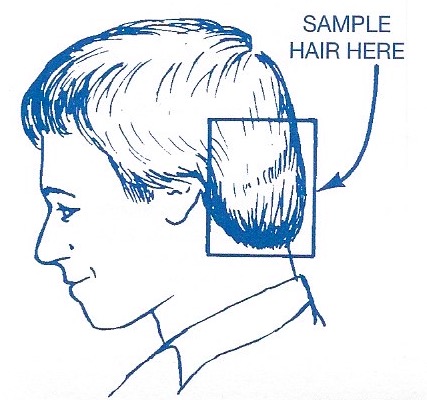
- Comb and lift a section of hair at the nape of the neck. If needed, either pin or clip the section, or have someone hold it out of the way.
- Cut as close to the scalp as possible

Tips:
- Although you can cut from anywhere on your head, cutting from the nape of the neck is often less noticeable.
- To avoid bald spots, cut several small sections of hair from the nape of the neck (or different places on your head) and combine them to make the sample.
- Head hair is preferred, but if you don’t have hair on your head then beard hair or underarm hair is also fine (use only one type of hair). Pubic hair is the least accurate so it’s accepted only if no other hair is available. If you’re not able to use head hair, make a note of where the hair is from on your New Client Questionnaire or Retest Questionnaire.
- If you shave your head, use a clean razor and save the clippings in a paper envelope. Repeat until you have enough hair.
- Keep track of which end of the cut hair is from the scalp. It’s the scalp end that’s needed.

3. Prepare the hair sample
What the lab needs:
- sample that’s a maximum of 1.5 in / 3.5 cm long
- at least 125 mg (approximately 1 tablespoon) of hair
What to do with the pieces of hair after you’ve cut them off:
- For short hair (1.5 in / 3.5 cm or less) keep the entire length of the hair.
- For longer hair, you’ll need to trim away the hair that exceeds 1.5 in / 3.5 cm. Measure from the root end out. Only keep the portion from closest to your scalp.
- Fill 1 tablespoon with hair.
- Write your name and age on a clean, paper envelope (not a plastic bag or aluminum foil).
- Put the hair sample in the envelope.
Tips:
- Use a ruler to help you see if your hair is already within the correct length or to help you trim to the correct length.
This website uses cookies.
We use cookies to analyze website traffic and optimize your website experience. By accepting our use of cookies, your data will be aggregated with all other user data.